
1. Always go with Natural Lighting for the shot. If you can, get right up to a window that faces the same direction as the sun. If the light is too strong use paper towels taped to the glass or hang a translucent piece of white fabric. I use a light weight shower curtain that I hang on the existing rod to filter out direct sunlight.


If its too dark I will add simulated outdoor light and white boards or a gold reflector to help fill in dark areas.

2. Make sure you are using the correct White Balance. This is huge. White balance is essential in not only making your food look appetizing, but it affects contrast and detail. You can use your in camera WB settings or a simple gray card. If you are really particular about getting it right like I am, there are gadgets like the ExpoDisc ($99) for use with your camera's custom white balance setting. You can read more about the disc and how to use it on my blog the modchik.
 |
The expodisc comes in various sizes, this is the 77mm. I used it to correct the color below. |

3. Add Visual Interest. Add tablecloths, place mats, linens, place settings or glasses to give the photo a more realistic and balanced look. Flowers or part of the ingredients in their natural state surrounding the dish look nice. Remember no one likes a lonely bowl of soup. In the photo below I used a circular patterned napkin from Crate and Barrel because they not only look sharp they reemphasize the round shape of the bowl.
 |
| Be careful of your backgrounds, I had a bright window in the background, could have diffused the light to avoid the blue spot. |


5. Get in CLOSE. From far away this muffin looks like your average baked good. Zoom in on this mouth watering zucchini muffin and you reveal it's been rolled in crispy toasted coconut.
 |
| Zoom in close enough and you also blur out the fact that this muffin sits a top a fancy paper plate. |

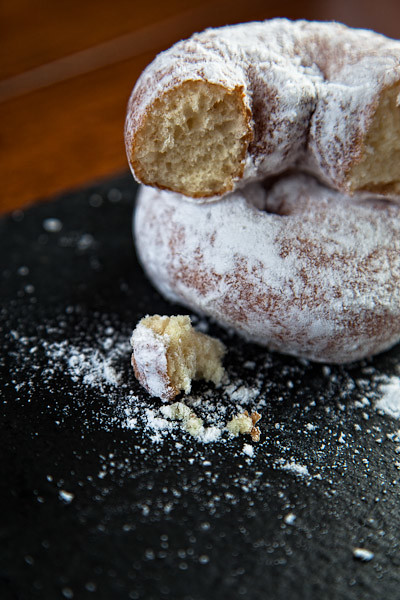
6. Slice it and dig in. You want the viewer to look at that photo, mouth open, ready for a mouthful. Food looks lifeless when it just sits there untouched. Leave some crumbs around evidence of its irresistible deliciousness.
7. Use f/16 as a starting point. I will admit this is a new tip for me. I recently attended a workshop from the husband/wife team House of Brinson (take a moment to go over and feast your eyes on some of their food photography, amazing, go ahead I'll wait). One of the first things they suggested, was to shoot at f/16. This way everything will be in focus from crust edge to crust edge. Of course when you are shooting at this small of an opening, the only way you are going to get a crisp shot is with a tripod. Another trick to help still your camera, turn on Mirror Lock. Most cameras will let you do this through the control panel. When you turn on this feature, the mirror will flip up upon the first depressing of the shutter release, then you press the shutter release a second time to actually take the photograph. Doing this gives the camera time to settle after the mirror flips open. Its takes a little while to get used to pressing the shutter twice, but I find it helps me get quiet and settled when shooting. The mirror lock disables in Auto mode on my camera (Canon).
 |

9. Rack em and stack em. Instead of plating one cookie, give it some visual pizazz by turning your Toll House cookies into the leaning tower of Pisa! Als, add height to the back of the plate, bowl or in this case the rack, this way you are able to see more depth. With such a shallow DOF on the holiday cookies, it is harder to tell. So, if you wanted all the cookies sharp, tilt the back end higher, close down your f-stop to f/16 and get your tripod out (basically tips 7 through 9).

10. Stay away from fried food. Trust me, it's really hard unless you have some good supporting actors next to it like this rack of ribs. In most cases fried anything by itself ends up looking like a greasy mess, so just make sure its in good company.

I want to leave you with one more thing: these were all very technical tips when it comes to shooting plated food. Next time you find yourself photographing food, think about who is eating that food. How is the food prepared? What is the circumstances surrounding the meal? Is there a special occasion? Try capturing the feeling behind the food, culture or sounds of the meal. There is something magical about being able to create a photo that not only highlights the food, but also tells a story. See if you can find it at your next table.
Lindsey | the modchik
25 comments:
Such awesome info here!
Thank you for this.
Great tips, thank you. I really need to pay attention to my white balance, it makes such a difference. Now I need to go and eat something.....
its great tips for us.. thank you so much for the share this tips with us...
Excellent. Thanks for the tips!
Fantastic collection of tips, i wanted to shoot for so many times and it never felt ght, the result was not even close to good. But having your post, i will definitely try and maybe imrove with time :) thank you.
Thanks! Great post.
fantastic tips lindsey! i learned a ton of new stuff!
Love this post, Lindsey. More than you can know. And those pictures have me salivating.
wow, f16!! I would have never ever thought to go that small. Thanks for the tips!!
I just love this post!
Great tips. I'm hungry!
This is such a great post! Really great helps. I have known for a while that I need a tripod. this just seals the deal.
Yummy photos, and such a great, information post.
Great post on food photography tips and definite drool worthy photos!
Fabulous tips and photos, Lindsey. Thanks for sharing!
Fantastic post, Lindsey. I love the idea of using a shower curtain as a diffuser.
I hate taking food photographs, but with these tips it makes me want to try! Great info! Thank you!
i never take food photos, but with your tips i just may be able to do it. thanks lindsey!
Great post! and yep, now I'm hungry :)
Exciting. Pavlovian. I've salivated on my keyboard. Many thanks for such an insightful and inspiring post. Off in search of grub to shoot...
Thanks Lindsey, for the great post! F/16 was a surprise to me. I'm looking forward to putting your tips to good use!
Good post.
I need to work and then re-work each one of these. Foodtography is so much harder than it looks I am discovering!
Debbie @ Beyond the Dog Dish
wow what a fantastic post!! thanks for sharing!
I like taking photos of amuse bouche... how odd that I should stumble upon your post: a real inspiration. Thanks!
Post a Comment
thank you for visiting. take a moment and say hi!